组件间通信
1. 简介
1.1 组件间通信基本原则
- 不要在子组件中直接修改父组件的状态数据
- 数据在哪, 更新数据的行为 (函数)就应该定义在哪
1.2 Vue 组件间通信方式
- props
- vue 的自定义事件
- 消息订阅与发布(如: pubsub 库)
- slot
- vuex
2. props
详见:其它小知识——props配置项部分
2.1 使用组件标签时
<my-component name='tom' :age='3' :set-name='setName'></my-component>
2.2 定义组件时
在组件内声明所有的 props
方式一: 只指定名称
props: ['name', 'age', 'setName']方式二: 指定名称和类型
props: {
	name: String,
	age: Number,
	setNmae: Function
}
方式三: 指定名称/类型/必要性/默认值
props: {
	name: {type: String, required: true, default:xxx},
}
2.3 注意
- 此方式用于父组件向子组件传递数据
- 所有标签属性都会成为组件对象的属性, 模板页面可以直接引用
- 问题:
- 如果需要向非子后代传递数据必须多层逐层传递
- 兄弟组件间也不能直接 props 通信, 必须借助父组件才可以
3. 自定义事件
一种组件间通信的方式,适用于:子组件 ===> 父组件
存在的问题:隔代组件或兄弟组件间通信此种方式不合适
使用场景:子组件想给父组件传数据,那么就要在父组件中给子组件绑定自定义事件(A 是父组件,B 是子组件,B 想给 A 传数据,那么就要在 A 中给 B 绑定自定义事件,事件的回调在 A 中)
绑定自定义事件:
第一种方式,在父组件中
<Demo @事件名="方法"/>或<Demo v-on: 事件名="方法"/>第二种方式,在父组件中
this.$refs.demo.$on('事件名',方法)<Demo ref="demo"/> ...... mounted(){ this.$refs.demo.$on('事件名',方法) }
若想让自定义事件只能触发一次,可以使用 once 修饰符,或 $once 方法
触发自定义事件:this.$emit('事件名', 数据)
解绑自定义事件:this.$off('事件名')
组件上也可以绑定原生 DOM 事件,需要使用 native 修饰符,如: @click.native="show",上面绑定自定义事件,即使绑定的是原生事件也会被认为是自定义的,需要加 native,加了后就将此事件给组件的根元素
注意:通过 this.$refs.xxx.$on('事件名',回调函数) 绑定自定义事件时,回调函数要么配置在 methods 中,要么用箭头函数,否则 this 指向会出问题
例:
src/App.vue
<template>
<div>
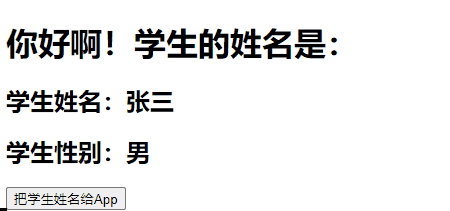
<h1>{{ msg }}学生的姓名是:{{ studentName }}</h1>
<Student @getName="getStudentName"></Student>
</div>
</template>
<script>
import Student from './components/Student.vue'
export default {
name: 'App',
components: {
Student
},
data() {
return {
msg: '你好啊!',
studentName: '',
}
},
methods: {
getStudentName(name) {
this.studentName = name
}
}
}
</script>
src/components/Student.vue
<template>
  <div>
    <h2>学生姓名:{{ name }}</h2>
    <h2>学生性别:{{ sex }}</h2>
    <button @click="sendStudentName">把学生姓名给App</button>
  </div>
</template>

<script>
export default {
  name: 'Student',
  data() {
    return {
      name: '张三',
      sex: '男',
      number: 0,
    }
  },
  methods: {
    sendStudentName() {
      this.$emit('getName', this.name)
    }
  }
}
</script>
效果:
4. 全局事件总线
一种可以在任意组件间通信的方式,本质上就是一个对象,它必须满足以下条件
- 所有的组件对象都必须能看见它
- 这个对象必须能够使用
$on、$emit、$off方法去绑定、触发和解绑事件
使用步骤:
安装全局事件总线
new Vue({
   	...
   	beforeCreate() {
   		Vue.prototype.$bus = this // 安装全局事件总线,$bus 就是当前应用的 vm
   	},
    ...
})
使用事件总线
接收数据:A 组件想接收数据,则在 A 组件中给
$bus绑定自定义事件,事件的回调留在 A 组件自身export default { methods(){ demo(data){...} } ... mounted() { this.$bus.$on('xxx',this.demo) } }提供数据:
this.$bus.$emit('xxx',数据)
最好在
beforeDestroy钩子中,用$off()去解绑当前组件所用到的事件
例:
src/main.js
import Vue from 'vue'
import App from './App.vue'

Vue.config.productionTip = false

new Vue({
  el:'#app',
  render: h => h(App),
  beforeCreate() {
    Vue.prototype.$bus = this // 安装全局事件总线
  }
})
src/App.vue
<template>
  <div class="app">
    <School></School>
    <Student></Student>
  </div>
</template>

<script>
import School from './components/School.vue'
import Student from './components/Student.vue'

export default {
  name: 'App',
  components: {
    School, Student
  }
}
</script>
<style scoped>
.app {
  background-color: gray;
  padding: 5px;
}
</style>
src/components/School.vue
<template>
<div class="school">
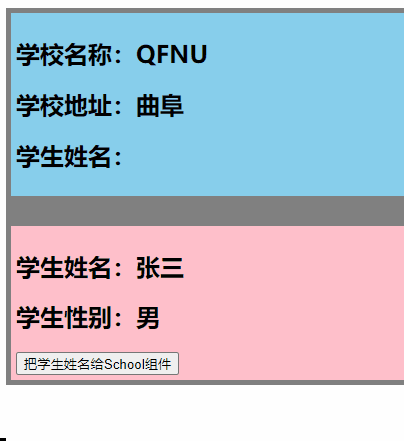
<h2>学校名称:{{ name }}</h2>
<h2>学校地址:{{ address }}</h2>
<h2>学生姓名:{{ studentName }}</h2>
</div>
</template>
<script>
export default {
name: 'School',
data() {
return {
name: 'QFNU',
address: '曲阜',
studentName: '',
}
},
mounted() {
this.$bus.$on('getData', (data) => {
console.log('我是School组件,收到了数据', data)
this.studentName = data
})
},
beforeDestroy() {
this.$bus.$off('getData')
},
}
</script>
<style scoped>
.school {
background-color: skyblue;
padding: 5px;
}
</style>
src/components/Student.vue
<template>
  <div class="student">
    <h2>学生姓名:{{ name }}</h2>
    <h2>学生性别:{{ sex }}</h2>
    <button @click="sendStudentName">把学生姓名给School组件</button>
  </div>
</template>
<script>
export default {
  name: "Student",
  data() {
    return {
      name: '张三',
      sex: '男',
      number: 0,
    }
  },
  methods: {
    sendStudentName() {
      this.$bus.$emit('getData', this.name)
    }
  }
}
</script>
效果:

5. 消息订阅与发布(基本不用)
消息订阅与发布(pubsub),消息订阅与发布是一种组件间通信的方式,适用于任意组件间通信
使用步骤:
安装 pubsub:
npm i pubsub-js引入:
import pubsub from 'pubsub-js'接收数据:A 组件想接收数据,则在 A 组件中订阅消息,订阅的回调留在 A 组件自身
export default {
    methods: {
        demo(msgName, data) {...}
    }
    ...
    mounted() {
			this.pid = pubsub.subscribe('xxx',this.demo)
    }
}
提供数据:
pubsub.publish('xxx',data)最好在
beforeDestroy钩子中,使用pubsub.unsubscribe(pid)取消订阅
例:
src/App.vue
<template>
  <div class="app">
    <School></School>
    <Student></Student>
  </div>
</template>

<script>
import School from './components/School.vue'
import Student from './components/Student.vue'

export default {
  name: 'App',
  components: {
    School, Student
  }
}
</script>
<style scoped>
.app {
  background-color: gray;
  padding: 5px;
}
</style>
src/components/School.vue
src/components/Student.vue
效果:
6. slot
6.1 理解
此方式用于父组件向子组件传递 标签数据
6.2 子组件
<template>
	<div>
		<slot name="xxx">不确定的标签结构1</slot>
		<div>组件确定的标签结构</div>
		<slot name="yyy">不确定的标签结构2</slot>
	</div>
</template>
6.3 父组件
<child>
	<div slot="xxx">xxx 对应的标签结构</div>
	<div slot="yyy">yyyy 对应的标签结构</div>
</child>